
Today—about five minutes from the time I’m posting this—is the final session of the Create with Code Summer live course, the Graduation Play-a-thon. I don’t, of course, know whether Last Day to Live will be one of the games chosen to be played during the Play-a-thon, but just in case it was I wanted to have as much done as possible before that final session… so I’ve been pulling a few all-nighters, and am looking forward to getting some sleep after the Play-a-thon is over. (But not necessarily immediately after, because as it happens I’m starting a new job this week…)
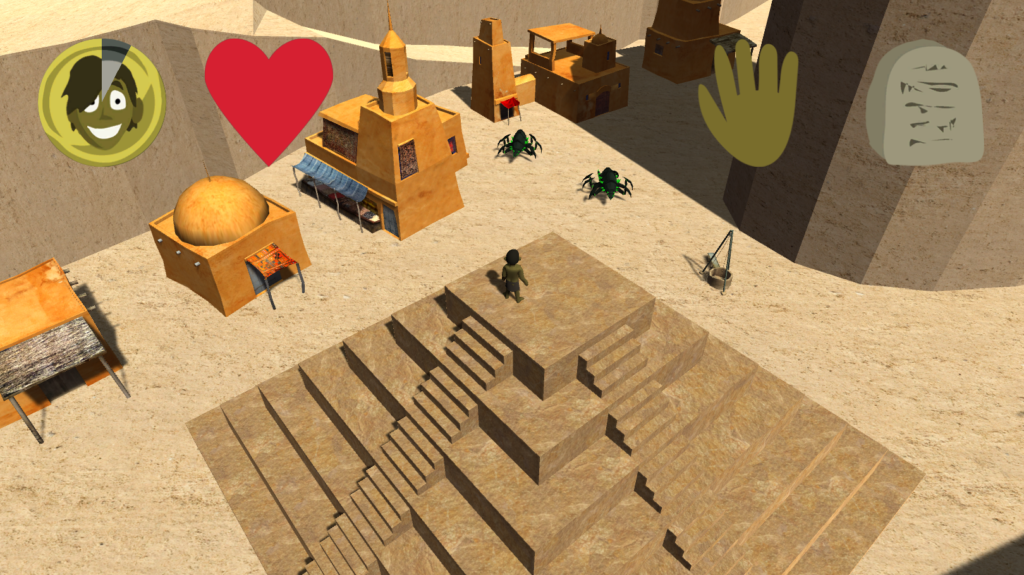
So, I said in the last post that my next step was going to be to create a model for the main character in Blender, following a tutorial I found online. And it… almost was. There was, however, another model I made first. I’d decided I wanted to have a ziggurat as a prominent feature of the starting village; it would be atop the ziggurat that the player started the game, and to which he would return when he died and was brought back to life. But I hadn’t run across any ziggurat models in the Asset Store that quite met my needs, so I figured I should create one.
I… may have overcomplicated things a bit. I wanted the stairs on the ziggurat to be walkable, but not the rest of it, so I created it in nine separate parts: one for each stair, one for each corner piece, and one for the center block. Unfortunately, this has the disadvantage of meaning that the texture is discontinuous where the stair piece meets the corner piece, but it’s small enough onscreen that that’s not likely to be noticeable. Still… it might have been better to make the ziggurat itself one piece, and I may redo it as such later.
(Speaking of textures, by the way, to give credit where it’s due, the textures for both the ziggurat and the sandy environment I got from textures.com.)
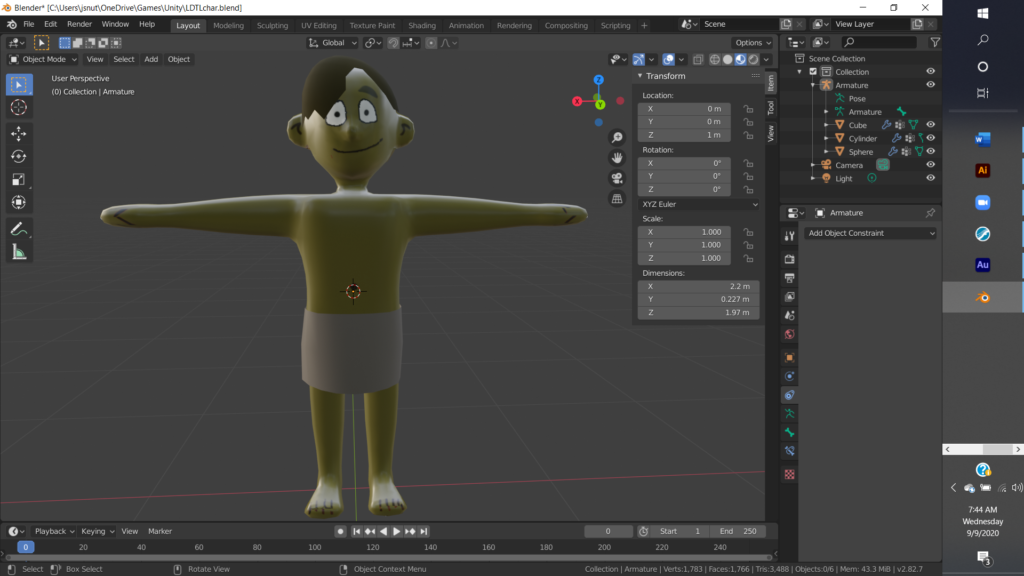
Then it was time to tackle the main character. Now, I’d used Blender a fair amount before, but usually to make fairly regular shapes, things like hallways and machinery. I hadn’t tried to make many more organic shapes with it, and I certainly hadn’t made any game character models. Still, there’s a first time for everything. I followed the tutorial I’d found, as well as a lesson on “creating a simple creature” in the Blender Essentials Training course on Lynda.com (to which I had free access through my Los Angeles Public Library card). And I managed to put together… something.
I’ll be honest. It’s not great. The elbows and knees sort of crumple up weirdly if they bend at too great an angle, for instance, and the edges of the mouth are a little wonky because they span different regions of the UV map—I should have set seams to make sure the entire face was in a single region. But it’s serviceable, for now. Its main saving grace is that it’s small enough in the actual game that you can’t really see these flaws—heck, given the shadow cast by the hair, you can’t really see the face at all. I’m going to want to redo it for the final version of the game, but it’ll do for the moment.
(At some point I intend to complete that Blender course… as well as the more recent Blender 2.8 Essential Training course. Blender is another program I’d really like to become more skilled with… as I said, I have used it before, but I’m far from an expert.)
Then came actually getting it into the game, and setting up the animations. Well, getting the model into the game wasn’t hard; I just exported it as an FBX with the appropriate settings and copied the FBX file into the right folder. And then I just dragged the model into the Player object in the hierarchy, and disabled the capsule that had been there as a placeholder. The animations, though, well, those turned out to be more involved than I’d expected. For some reason I’d gotten the idea that Unity came with a free set of animations for use with a humanoid rig. It does not.
There were free animations available in the Asset Store, but none that quite met my needs; I needed a set of animations that included at minimum an idle animation, a jump animation, a walk or run animation (or preferably both), and an attack animation. The human characters that are included in the Create with Code Course Library did include all those animations, so I tried to use them with my character—I wouldn’t be able to use them for the final version of the game, since that package is explicitly not for use in commercial products, but I could use them as a stopgap for the in-progress version I would post for the Create with Code course. However, apparently they were specially designed for those particular models, and I couldn’t get it to work with my character.
I did eventually find a suitable set of animations in the Asset Store that had what I needed and that, while not free, was affordable: Fighter Action Pack #1 by AOF Entertainment. So then I had to set up the animation controller. The package did come with a controller, but it was just a demo controller that cycled through all the animations, and clearly wasn’t suitable for actual use in a game. But I’d learned enough from Prototype 3 in the Create with Code course to set up a rough controller at least for the character’s walking and running; I’d deal with the other animations later. Again, my work was far from perfect; the animation wasn’t really synced with the character’s movement speed. But I could refine it later; for now I just wanted to get it in and have something as presentable as possible (given the time constraints) for the Play-a-thon.
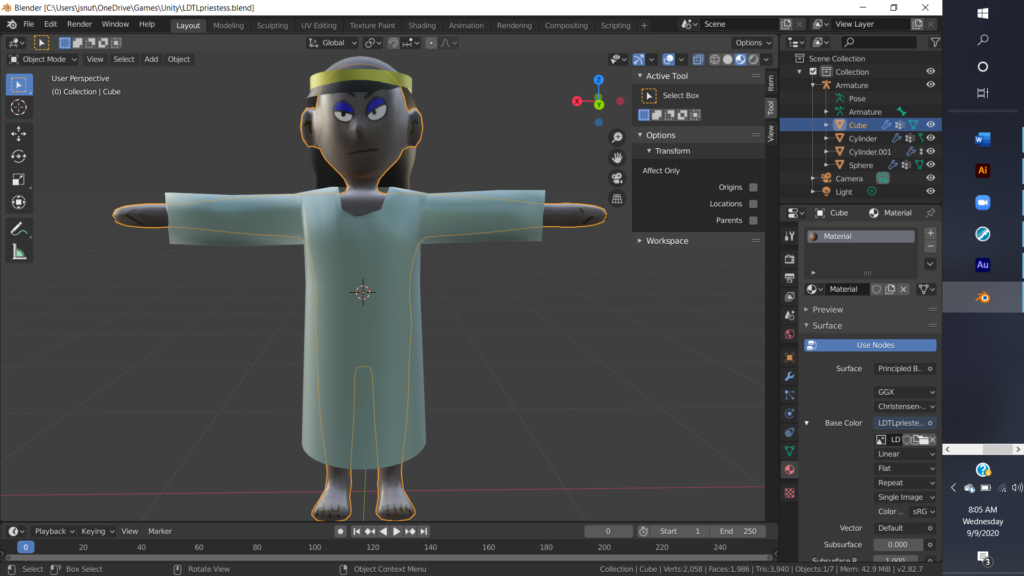
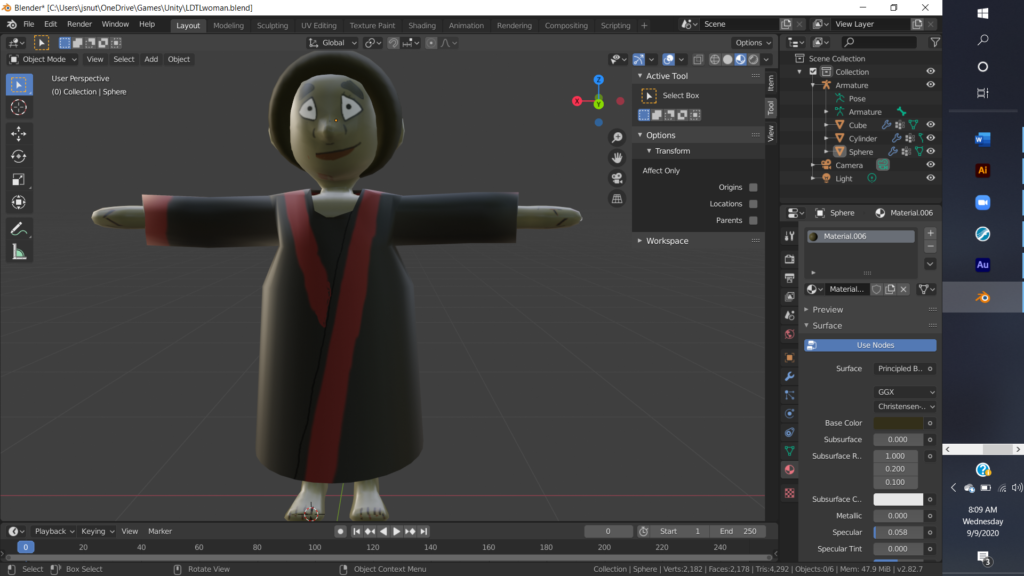
With the player character created, I then wanted to create models for NPCs. I didn’t want to go overboard for now; I just needed a model for the priestess who delivers the introductory dialogue and brings the player back from the dead, and another model for a generic NPC. I had already created dialogue sprites for these characters, so I had to wanted to make the models match the sprites. Rather than make them from scratch, I took the model I’d created for the player and modified it, and once again the results were… not great, but good enough for now, I guess. There’s quite a bit of clipping with the characters’ clothing, among other issues, but again the character is small enough in the game that it’s not all that noticeable, and I’ll create more polished versions of the character models later.
I think the next course I’m going to go through in Unity Learn is the Beginner Art course, and hopefully that (and the aforementioned Blender courses) will help me get better at creating character models. I’ve already gone through the first few lessons in the course, and they covered creating concept art for the characters, which… I didn’t do for these characters, and I should have. Again, I’d already had their dialogue portraits done; I thought I had a good enough idea for what I wanted them to look like; but if I’d had detailed concept art it would have helped me know what proportions I was aiming for, and so on. Well, next time.
Well, now that I had the NPCs, I wanted to put them in the game and give them dialogue. As described in a previous post, the dialogue is stored in a series of ScriptableObjects, and, well, creating new dialogue nodes is kind of a pain. I did use a CreateAssetMenu attribute so I could create new dialogue nodes through the menu in the editor, but filling in all the requisite fields and linking the nodes together properly is still a bit unwieldy. I went through an Introduction to Scriptable Objects tutorial on Unity Learn to learn more about ScriptableObjects and how to use them, and that tutorial showed how customized interfaces could be created in the editor for particular ScriptableObjects—such an interface would really streamline the creation of new dialogue nodes, and would save me a lot of time in the long term if I wanted to put a lot of dialogue in the game (which I do). However, it would take a lot of time in the short term (especially since the tutorial really glossed over the details of the implementation, so I’d need to do a lot of reading up on the relevant documentation), and I wasn’t planning on putting in that much dialogue before the Graduation Play-a-thon, so I figured it would be best to put that off till after the Play-a-thon. So… that’s another item on my to-do list.
So, anyway, I had character models; I had NPCs with dialogue; what else did I really want to implement before the Play-a-thon? Well… a title screen. I envisioned a title screen with billowing dark mist behind the text, and when the player pressed a key to start the game the mist would part revealing the game setting behind it. And… it worked. That is to say, in contrast with the difficulty of creating the models and the animation, putting in the mist-shrouded title screen (using a couple of particle systems) turned out to go quite smoothly, and I got that done quicker than I expected.
So… those were the big jobs I wanted to get done before the Play-a-thon. But there were a lot of details to take care of. I noticed that the player had trouble going up the ziggurat steps, and spent a lot of time trying to solve that problem. I tried replacing the Mesh Collider on the steps with a new Mesh Collider shaped like a smooth ramp, and that did help, but not enough. The player would still struggle to go up the steps, or would go partway up and then slide down. Was the angle at fault? Well, the steps were an angle of 45 degrees, which was exactly the maximum angle for the NavMesh Agent… but increasing that maximum angle didn’t seem to help either.
The problem, it seemed, was gravity. The steps were steep enough that the player had trouble overcoming gravity to go up them, and would slide down i the player stopped on the steps. Well, I didn’t want the player to be unable to stop on ramps, so I figured maybe I should turn gravity off when the player was in the Nav state, navigating by means of the NavMesh. And in the Idle state as well, since I didn’t want the player to slide down the ramp when stopped. But I did want the player to fall in the Idle state if there was no ground beneath him. Hm. The solution to that, it would seem, was to check if the player was close to the ground, and turn gravity off if so, and on if not; the SamplePosition method I mentioned in the last post was useful once again. At first this was still clunky, but then I realized I was checking if there was any ground within 1 meter of the center of the player—which was 1 meter above the ground! It would be better to check if there was any ground within 1 meter of the player’s feet. Eventually, I more or less got it working, though I later ran into issues with the player randomly flying away at times and had to track down a special case where I should have set gravity in some player state and didn’t.
Also causing an interesting series of cascading errors, albeit to a lesser degree, was giving the enemies a death animation. Having gotten the player’s movement working (as well as I was going to for now), I wanted to try to implement more animations: a jump animation for the player, attack animations for both the player and the enemy, and a death animation for the enemy. That last one, that turned out to be tricky. First of all, the enemy would sometimes disappear immediately on death, instead of going through the animation, and sometimes would teleport a short distance away. I eventually figured out that this was because I’d been returning the enemy to its original position on death, so it would respawn back where it started; this was fine when the enemy was disabled immediately on death, but now it was returning to its starting position before playing the death animation. Moving the bit of code that returned the enemy to its starting position solved that problem.
But there was another issue. The enemy would go through the death animation… and then spring immediately get back up! Well, this turned out to be a bit complicated. The death code was in a class called Damageable, that I’d made so i could use it for damageable objects as well as creatures. But creatures that actually fought back were in a class called Combatant that inherited from Damageable—and part of the code for the Combatant class ran a coroutine to make the enemy attack the player at intervals. Well, when the enemy died but before it was actually disabled (since it now stuck around for a bit to go through its death animation), that coroutine was still running, and if the enemy attacked the player during that time it would jump into its attack animation. Okay, so I stopped that coroutine when the enemy died. Simple. Except it was still getting back up! This, as it turned out, was due to another coroutine in the Enemy class, which inherited from Damageable: that class had a coroutine that would watch for the player coming too close to the enemy, and initiate hostilities if so… which meant triggering the attack code in the Combatant class, which meant starting up that coroutine again, which meant… anyway, I stopped that coroutine too on the enemy’s death, and that finally solved the problem. This meant the Die() virtual function in the Damageable class now had an overrides in both the Combatant class and the Enemy class, but hey, that’s what virtual functions are for.
Anyway, there’s more I could write about other details I took care of over the last few days… and some issues that remain to be fixed. (Most notably, for some reason after fighting enemies the player model sometimes gets turned around and starts moving backwards; still haven’t worked out what’s going on there.) But I think I’ve hit the highlights, and I wanted to get this post up before the Create with Code Play-a-thon… which, as mentioned in the (sentence I just went back and edited in the) beginning of the post, is in about five minutes. So I’m going to end this post here, but I’ll definitely still have more to say about this project later…
Oh, oops, forgot the link to the latest build again. You can play it here.